How to Troubleshoot Your Sewing Machine
You’ve read the last post on cleaning and maintaining the sewing machine, but it still creates a mess when you start sewing. What do you do?
The first two things that I always do when my sewing machine doesn’t work is:
Clean it - remove all traces of dust
Oil it - make sure all parts can move, and even those in the casing above the needle
But we all make mistakes - big ones, small ones, and even silly ones that make you want to hide under a tree. The latter has happened to me before and I was cringing with embarrassment. I had cleaned and oiled and the sewing machine refused to work. Eventually, I enlisted the entire universe (well, everyone I knew who knows how to sew!) to take a look at the machine. I took it apart and uploaded a video to show which parts were jammed. The lovely Karen from RUDE Record even made a video on sewing machine repair just for me. We were on a mission to fix my machine, and we were determined to get it fixed.

Sewing Machine Repair
I was so sure that it was a mechanical fault....I was going to call the repair man.... I HAD to...
but then...
it was then I realised that NOTHING was wrong with my machine....
I had not seen this coming - I had not shifted the bobbin holder into the correct position for sewing! The machine was prepped for filling up a bobbin instead of sewing. HIDE!
Sometimes we are so engrossed with fixing things that we forget that it might be a simple thing - I can't believe how many things I had done before finally realising that all that was required was a simple shift of the bobbin holder.
So, if your machine jams, DON'T jump to conclusions and call the repair man. Have this CHEATSHEET ready if you think it needs a repair!!
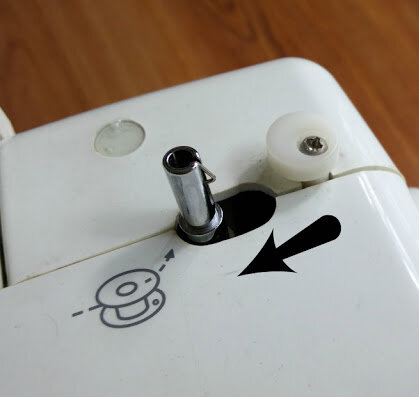
Is your bobbin holder in the correct position?
#1 Is the Bobbin Setting Correct?
Make sure the holder is in the correct position. If you have the machine set for threading a bobbin, it will definitely feel like it's jammed when you attempt to sew.
#2 Did You Check the Needle?
Maybe the needle is bent or you are using the wrong one for your project.
One easy way of remembering which needle you have in the machine is NOT to leave it there at all. You could do one of the following after a sewing project:
take the needle out and put it back in a labelled container.
apply a small lick of nail varnish onto the shaft to remind you that it has been used
tape it to the sewing machine with masking tape
If it’s damaged, pop them into a jar for recycling.
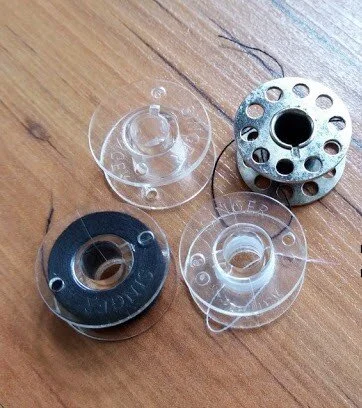
Bobbins - always use the correct ones for your sewing machine
#3 Do You Have the Correct Bobbin?
Use a bobbin that's made for your sewing machine. An incorrect one won't turn properly and can cause the thread to jam the machine. Always use the bobbins that are made for the brand of your sewing machine. I previously tried using the metal ones and realised that they were not spinning smoothly in the bobbin case, causing the thread to jam.
#4 Have You Cleaned Out the Dust / Lint?
Use that tiny brush that comes with the machine and give it a good spring cleaning. The most important areas are the dog feed (unscrew and clean) and the bobbin case. Don't use tissue as this will leave even more dust behind.
Tilt the machine towards you to get rid of any broken needle remnants inside the bobbin area that maybe causing the jam.
#5 Wrong Tension Setting?
Check the tension dial - make sure you have the right tension for the type of sewing you want to do. It’s very easy for me to forget to change my tension setting for free motion embroidery to regular sewing!
Have you ever jumped to conclusions with your work?
Do you have any sewing machine repair tips to offer?